“Unable to open BOOTIT.DAT” Error Message
Problem:
Using the Boot Menu to boot a menu item, switch to the Direct Boot menu, or enter maintenance mode results in error text being displayed:
Unable to open BOOTIT.DAT.
The system is unresponsive at this point and must be restarted or reset.
Additionally, using the BootIt UEFI boot media to upgrade the installation will not show the Upgrade BootIt UEFI option. Instead, the Reinstall BootIt UEFI option will be shown.
Cause:
Unmounted UEFI file systems are not remounted. This issue is more likely to occur with UEFI implementations based on an older code base.
Solution:
First, check if a BIOS update is available for the system. The update may resolve the cause of the problem. Otherwise, you can use a work-around added to BootIt UEFI via the UEFINoRemount option. Using this work-around will allow basic usage of BootIt UEFI. However, this work-around has limitations. These limitations include, but may not be limited to, the following:
- When upgrading a BootIt UEFI installation you will need to use the Reinstall BootIt UEFI option (the upgrade option will not be shown).
- Scripts can't be run from the desktop.
- Scripts in Boot Items won't be run.
- TBOSDT will not have a C: prompt (file system is not available). Partitions can be mounted for access. Scripts may have errors or conflicts if run from a mounted partition.
- Image for UEFI GUI isn't supported. Refer to the applicable section at the end of this article if you would like to use the CUI version.
- Image for UEFI options will have default values (custom settings will not be read).
- If you need to disable the UEFINoRemount option you will need to do it manually by editing the installation's BOOTIT.INI file.
What you will be able to do:
- Use the Boot Menu, Direct Boot Menu, and Maintenance Mode.
- Use Boot Edit to manage boot items.
- Use Partition Work.
- Use TBOSDT.
- Use Image for UEFI CUI.
Manually enabling the UEFINoRemount option
Edit the installation's BOOTIT.INI file and add UEFINoRemount=1 to the [Options] section. Any text editor with access to the EFI System partition can be used for this. Instructions using the BootIt UEFI boot media are shown here.
- Boot the system to the BootIt UEFI boot media.
- Cancel the installation prompt to go to the desktop.
- Click the Partition Work icon (or press W).
- Select the drive with the EFI System partition where BootIt UEFI is installed.
- Select the EFI System partition and click the Edit File button.
- Browse to the \EFI\BootIt folder, select the BOOTIT.INI file, and then click OK.
- Locate the [Options] section and add the UEFINoRemount option. For example:
[Options]
UEFINoRemount=1
- Click OK to save and close the file.
- Reboot the system to the installed BootIt UEFI.
Reinstalling BootIt UEFI with UEFINoRemount enabled
- Refer to the applicable section at the end of this article if you would also like to replace Image for UEFI GUI with Image for UEFI CUI.
- Run the MakeDisk utility for BootIt Collection.
- Proceed normally through the steps, selecting to create the BootIt UEFI boot media.
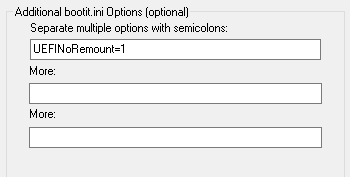
- When you reach the Additional bootit.ini Options (optional) step, enter the following in one of the text boxes:
UEFINoRemount=1
Example:
- Finish creating the boot media.
- Reinstall BootIt UEFI.
Manually disabling the UEFINoRemount option
Edit the installation's BOOTIT.INI file and remove UEFINoRemount=1 from the [Options] section. Any text editor with access to the EFI System partition can be used for this. Instructions using the installed BootIt UEFI are shown here.
- Boot the system to the installed BootIt UEFI.
- Enter Maintenance mode to go to the desktop.
- Click the Text Editor icon (or press X).
- Select the BOOTIT.INI file and click OK.
- Locate the [Options] section and remove the UEFINoRemount option.
- Click OK to save and close the file.
Replacing Image for UEFI GUI with Image for UEFI CUI
You can replace Image for UEFI GUI with Image for UEFI CUI by copying the CUI imageu.efi file into the installation (it will replace the GUI imageu.efi file). This can be accomplished using normal file copy procedures providing you have access to the EFI System partition. Below are the steps required to perform the replacement when creating the BootIt UEFI boot media, which can then be used to install (or reinstall) BootIt UEFI with Image for UEFI CUI.
- Download Image for UEFI CUI from your TeraByte account and unzip it.
- If not already done, download BootIt Collection from your TeraByte account and unzip it.
- Copy the imageu.efi file from the unzipped CUI files into the biu folder of the unzipped BootIt Collection files. It will replace the existing imageu.efi file.
- Create the BootIt UEFI boot media normally using the MakeDisk utility.
Alternatively, if you have already created a BootIt UEFI USB flash drive (or other writable media) you can simply copy the CUI imageu.efi file into its \efi\bootit folder to update it.