Restoring to a Smaller Drive or Partition
Introduction
Despite ever increasing hard drive sizes, many users find themselves in situations requiring them to move to a smaller drive. The difficulty level of this process depends on a number of factors, including the method used and the details of the particular configuration. This article presents several methods to accomplish this task and, hopefully, provide a trouble-free transition.
Typical reasons to move to a smaller drive or partition include:
- Moving the OS partition to a faster drive (e.g., going from a 1TB hard drive to a 256GB SSD drive)
- Segregating the OS from data (e.g., splitting a single 950GB partition into a 100GB OS partition and a 850GB data partition).
- Splitting a RAID 0 setup into single drives
- Migrating to a new physical system or to or from a virtual system
- Emergency recovery using parts on hand
- Testing recovery scenarios
Note: Make sure you're using the current version of the TeraByte imaging program(s). Older versions may not provide full support for the operations detailed in this article.
Methods to Try First
The TeraByte imaging programs have several options available to aid restoring or copying to a smaller drive or partition. In many cases, using one or more of these options is enough to allow the successful completion of the operation.
Note: Using these options assumes the actual amount of used space on the source image/drive can actually fit on the destination drive. If this is not the case, or you try these methods and the imaging program reports there's not enough free space available, proceed with this article and determine the steps required (e.g. reducing the required space amount).
- If restoring an entire drive image or copying an entire drive:
- Use the Scale to Fit option.
- If the source partitions (those being restored or copied) have free space between them (partitions not contiguous), also use the Remove Gaps on Restore or Remove Gaps on Copy option.
- If there is still not enough free space available, use the Compact Data option. This will compact FAT/FAT32/NTFS partitions during the restore (or copy) operation to fit in the smallest space required to hold the data. Note: A clean file system is required. File system errors that prevent a resize from succeeding will result in a failed operation.
- If restoring or copying a single partition:
- Try restoring or copying the partition to the destination. If possible, the partition will automatically be resized smaller to fit.
- If the selected destination isn't large enough for a normal restore or copy, use the Compact Data option. This will compact FAT/FAT32/NTFS partitions during the restore (or copy) operation to fit in the smallest space required to hold the data. Note: A clean file system is required. File system errors that prevent a resize from succeeding will result in a failed operation.
Procedure Summary
The basic steps are as follows:
- Determine the minimum space required to restore the partition(s)
If the source partition contains more data than can fit on the new smaller partition it will be necessary to delete files or move files to a different drive.
When moving an entire drive to a smaller drive, you will need to check space requirements for each partition on the source drive.
- Check the file system for errors
Run chkdsk /f on the source partition(s) to check for file system errors. Errors can cause compacting and resizing to fail. Note: You may want to run MEMTEST86 before chkdsk if RAM integrity is unknown.
Checking the file system isn't an option if you will be restoring directly from an existing image using the Compact Data option. In that case, just be aware that any errors may prevent the resize from succeeding. (See Appendix B for an example using TBIHD to check the file system on partitions in an image.)
- Compact or resize the partition(s)
At this point, you have several choices:
- If restoring from an image, perform a normal restore operation using the Compact Data* option to resize the partition(s) during the operation (no need to compact first and create a new image).
- Perform a normal copy operation using the Compact Data* option to resize the partition(s) during the operation (no need to compact the source partitions first).
- Use the compact feature in the imaging programs to reduce the minimum required size or use BootIt to resize the source partition smaller. In either case, use a size less than that of the new smaller partition.
When moving an entire drive to a smaller drive, you may need to compact or resize multiple source partitions.
*Note: The Compact Data option is only supported on FAT/FAT32/NTFS partitions and requires a clean file system. File system errors that prevent the resize from succeeding will result in the destination partition being deleted (the data is not usable). - If restoring from an image, perform a normal restore operation using the Compact Data* option to resize the partition(s) during the operation (no need to compact first and create a new image).
- Create a backup image of the drive or partition
Once the source partition or drive is ready (files moved, partitions compacted, file systems checked, etc.), create a backup image. Skip this step if you will be copying the source partition(s) or drive to the smaller drive.
- Restore the image (or Copy) to the new location
When restoring or copying a partition, specify the desired new smaller size. If restoring a drive image or copying an entire drive, use one of the scale options, such as Scale to Fit. It may also be necessary to use the Remove Gaps on Restore or Remove Gaps on Copy option.
Preparing for the Move
Depending upon the specifics of the move and which method will be used, it's possible extensive changes will be made to the existing data — file systems resized or compacted, data deleted, programs uninstalled, file systems repaired, and so on. It is recommended to create a backup image of the drive before proceeding if data safety or the ability to return to the present state is important to you.
As an example, you may be moving from a 500GB Windows drive to a 128GB SSD. You plan to delete many gigabytes of files you won't need and uninstall several large programs. However, you would also like to preserve the data on the 500GB drive. One way to do this is to create a backup image of the drive and then make the desired changes. A new backup image can then be created and restored to the SSD (or the drive could be copied). Once the SSD is ready for use, the original drive image can be restored to the 500GB source drive, returning it to its original state.
Understanding Partition Data Organization
When you set up a hard drive, you can create logical partitions. A logical partition is simply a conceptual division on the hard drive. You can use different file systems in different partitions, and many users partition hard drives so that they can store different operating systems or segregate data on the same hard drive.
Formatting is the process that prepares a partition on the hard drive to accept data by creating an empty file system that is organized into clusters. A cluster, a logical grouping of contiguous sectors, is the smallest logical unit of storage that you can allocate to hold a file's data.
The table below depicts the layout of files within clusters on a hypothetical partition. 44 clusters contain data, with the last cluster in use (the cluster closest to the end of the partition) being located 75% into the partition.
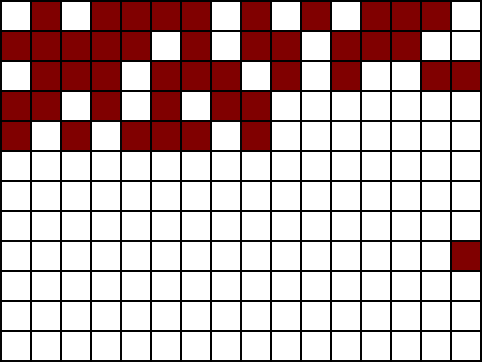
By default, the location of the last cluster at the time that you create an image determines the minimum amount of free space that must be available on the hard drive to which you intend to restore. In this example, assuming the partition size was 100GB, you would not be able to restore it to a space smaller than 75GB.
The table below is a representation of the partition after being compacted. It contains the same number of used clusters with no unused clusters interspersed. As a result, an image of this partition can be restored to a much smaller destination.
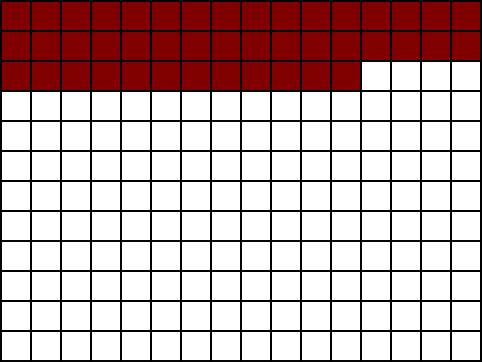
Compacting and resizing are both operations that allow you to relocate the data in the partition while maintaining its integrity. Compacting leaves the partition size unchanged and moves the data so it fits the smaller specified size. Resizing a partition smaller is similar to compacting, but also reduces the size of the partition.
More information on this subject can be found in Appendix C: Introduction to Hard Drive Storage of the Image for Windows User Manual.
Determining the Space Required
When determining the minimum space required to restore a partition it's important to understand that, by default, the TeraByte imaging programs restore the partition image as an actual image. As explained in the previous section, this requires the same space for the data as the source partition since the restored data is not relocated within the destination partition while being written. Any resizing of the restored partition takes place after the restore has completed. This behavior can be changed when restoring or copying FAT/FAT32/NTFS partitions by using the Compact Data option to compact the data during the procedure instead of requiring it to be performed beforehand.
The minimum space required to restore a partition can be determined from the source partition, from the image file, or by attempting to restore the partition image. Keep in mind that the actual minimum space required depends on the method used to perform the restore or copy operation. If doing a normal restore or copy the MIB/GIB to Restore value is required. If doing a restore or copy using the Compact Data option the MiB/GiB Used value is required. Please note that these values represent the data only — operating systems may require an additional minimal amount of free space in order to function correctly.
To Check the Source Partition:
- Start the TeraByte imaging program of your choice and select the Backup option (can be either Full or Changes Only).
Note: Viewing the information for individual partitions is not available when Simple Operations mode is enabled. If necessary, go into Settings (graphical versions) or Global Settings (console versions) and disable the Simple Operations option.
- Proceed though the steps until you get to the screen where you select which partitions to include.
- Highlight the partition and click the Information button in Image for Windows, Image for DOS GUI, and Image for Linux GUI, or press F1 in Image for Windows (Console), Image for DOS, and Image for Linux.
- Along with other details, the number of MiB/GiB Used and MiB/GIB to Restore are displayed.
- Cancel creating the backup and exit the imaging program.
To Check the Image File from the Program Interface:
- Start the TeraByte imaging program of your choice and select the Restore option (can be either Normal or Automatic).
- Proceed though the steps until you get to the screen where you select which partition(s) to restore.
- Highlight the partition to check and click the Information button in Image for Windows, Image for DOS GUI, and Image for Linux GUI, or press F1 in Image for Windows (Console), Image for DOS, and Image for Linux.
- Along with other details, the number of MiB/GiB Used and MiB/GIB to Restore are displayed.
- Cancel restoring the backup and exit the imaging program.
To Check the Image File from the Command-line:
Run the TeraByte imaging program of your choice from the Command Prompt and specify the /L, /ALL, and /F options. Program output can be redirected to a file for easy reference.
Using Image for Windows, Image for Windows (Console), or Image for DOS:
- If running in Windows, start an Administrator Command Prompt.
- Change to the folder containing imagew.exe, imagewc.exe, or image.exe.
- Run the command (Image for Windows is used below):
imagew /l /all /f:"e:\backups\my backup" > output.txt
This will obtain all the partition information from the e:\backups\my backup.tbi image and save it to a file named output.txt in the same folder as imagew.exe.
If using Image for Windows (Console) you can view the output onscreen by not redirecting it. For example:
imagewc /l /all /f:"e:\backups\my backup"Using Image for Linux from the IFL Boot Media:
- Boot to the IFL CD. If necessary, mount the partition or network share that contains the backup image file. Use the Mount Network Shares menu option or exit to the Command Prompt and use dpmount.
- Select the Exit To Command Prompt menu option. By default the current path is the one which contains imagel (/tbu).
- Run the command:
imagel -l --all --f "mnt1/backups/my backup" > output.txt
This will obtain all the partition information from the mnt1/backups/my backup.tbi image and save it to a file named output.txt in the same folder as imagel. Note: The output.txt file will contain escape code sequences as well as the partition data and may look strange in a text editor.
Output can also be viewed onscreen by not redirecting it:
imagel -l --all --f "mnt1/backups/my backup"
Use Shift-PgUp and Shift-PgDn to scroll through the output. If the console buffer is too small to let you view all the information you will most likely need to redirect it to a file (piping the output through "more" may not display it correctly).Using Image for Linux installed in a Linux OS (Ubuntu is used below):
- When booted into Ubuntu, open a new text console by pressing Ctrl-Alt-F1.
- Image for Linux requires the user to be a member of the "disk" group. In Ubuntu you can also use "sudo". Log in as an appropriate user.
- Change to the folder containing imagel.
- Run the command:
./imagel -l --all --f "/backups/my backup" > output.txt
Using "sudo":
sudo ./imagel -l --all --f "/backups/my backup" > output.txt
Note: There are a number of Linux shells and they handle quotes and parameters with spaces differently. It may be necessary to use an alternate format for the command. Two methods are shown below:
./imagel -l --all "-f:/backups/my backup" > output.txt
./imagel -l --all --f:\"/backups/my backup\" > output.txt
This will obtain all the partition information from the /backups/my backup.tbi image and save it to a file named output.txt in the current folder. Note: The output.txt file will contain escape code sequences as well as the partition data and may look strange in a text editor.
Depending on the shell being used, output may also be viewed onscreen by not redirecting it:
./imagel -l --all --f "/backups/my backup"
Use Shift-PgUp and Shift-PgDn to scroll through the output. If the console buffer is too small to let you view all the information you will most likely need to redirect it to a file (piping the output through "more" may not display it correctly).Note: When redirecting output to a file it is recommended to run the command first normally (to view onscreen) and make sure it completes successfully. Doing this will allow you to respond to any errors if there's a problem with the command.
An excerpt of sample output for a Windows 7 partition is shown below:
Name: Win7
Start LBA: 206848
End LBA: 320866303
Sectors: 320659456 (156572 MiB)
FS ID: 7 / 7 / 7
ID: 0x2
PE Flag: 0x0
Free Sectors: 142605008 (69631 MiB)
Used Sectors: 178054448 (86941 MiB)
Last Used Sector: 213256415 (104129 MiB)
MBR Entry: 1
MBR End CHS: 1023/254/63
MBR Flag: 0x0
Data Info: 11014144 / 54911072479 / 54922086643 / 0x0Examine the output and find the details of the partition you're going to restore. The Last Used Sector value determines the minimum space required to restore the partition if the Compact Data option is not used. The Used Sectors value is the minimum space required for just the data.
To Check by Attempting to Restore the Partition Image:
Note: This method is included for completeness only.
- Start the TeraByte imaging program of your choice and select to do a normal restore of the partition.
- Select the destination partition or free space area and click Next.
- At this point, depending on the specifics of the partition and version of the imaging program, a notice with the number of MiBs required may be displayed if the destination is too small (if you must know the minimum size and the notice is not displayed, you can select a very small partition or one you know is too small as the target).
Important Note: When restoring or copying a partition, any unallocated space located adjacent to the destination partition will be included in the available size. For example, if the drive contains a 10GB partition and has 25GB of free space adjacent to it, you could successfully restore a partition image that requires 30GB to the 10GB partition. The restored partition will begin at whichever location is located towards the beginning of the drive. For example, if the free space is located before the partition, the restored partition begins where the unallocated space begins.
Disk images and partitions that would fit if compacted are treated differently — you will not be notified if the image won't fit after selecting the destination drive/partition. Instead, you must proceed to the options screen and click Next. The reason for this is that alignment options, one of the scaling options (Scale to Fit or Scale to Target), or compaction (Compact Data) may be used, which could change the requirements. The actual space necessary cannot be determined until the state of all options are known.Note: Mounting an image with TBIMount will not allow you to obtain the minimum size required for a restore.
Removing Unwanted Programs and Files
Once you have determined the space that will required to restore or copy to the new smaller drive or partition, you'll know how much data will need to be removed to allow it to fit. In many cases, this will require deleting large data files (archives, ISO downloads, installers, videos, music, etc.) . You may also need to uninstall certain programs, planning to reinstall them to a different partition when needed.
It should be noted that deleting files from a partition may not lower the minimum required size to restore the partition if the Compact Data option isn't used since data may still exist at previous furthest "in use" location on the partition. Check the space required after deleting files to determine the current size.
If moving to an extremely small drive (like a small SSD), you will likely need to remove almost everything that isn't part of the standard Windows installation. In these cases, you may want to consider the option of installing Windows to the new drive and starting over fresh.
Make Sure the File System is Clean
Whether restoring to a smaller drive or to a smaller partition, file system errors on any of the source partitions can cause numerous errors, including failure to resize or compact the partition. If you are unsure of the condition of the file system, you may want to run chkdsk /f on it before imaging or copying it. In general, it's a good idea to run MEMTEST86 before running chkdsk (bad memory may cause chkdsk to corrupt the partition).
To run chkdsk, open a Command Prompt (an Administrator Command Prompt is required in versions of Windows with UAC is enabled) and run the following command, making sure to use the correct drive letter for the partition to be checked:
chkdsk c: /f
Note that checking some partitions, such as the Windows partition, may require Windows to restart. In the case of multiple partitions needing to be checked it may be advantageous to check them from WinRE/PE (e.g., TBWinRE, TBWinPE) — since Windows isn't running and no partitions are locked, restarts will not be required.
Compact or Resize the Partition(s)
Compacting or resizing a partition requires that it be available to be modified. If the only source of the desired partition is an image backup and it fails to restore properly using the Compact Data option (or is unsupported), you would generally first restore the image to a drive large enough to contain it so it can be checked (if necessary), compacted (or resized) and then reimaged or copied. The backup can be restored to a virtual disk if a physical disk is not readily available. Once the partitions have been compacted a new image backup can be created from the virtual disk or a copy operation can be performed using the virtual disk as the source (refer to the applicable TeraByte imaging program manual for more information on restoring, backing up, and copying virtual disks). It may also be possible to load the image using TBIHD and make the changes (see Appendix B).
Also note that you can't compact a partition that's in use (for example, you can't compact the booted Windows partition). You would need to boot to Image for DOS, Image for Linux, or Image for Windows (e.g., TBWinRE, TBWinPE).
To compact a partition:
- Start the TeraByte imaging program of your choice.
- Select the Backup option (can be either Full or Changes Only).
- Proceed though the steps until you get to the screen where you select which partitions (or drive) to include.
- If compacting one or more partitions on a virtual disk use the Add Virtual Drive option and add the desired disk.
- Highlight the partition that needs compacted.
- Click the Compact button (graphical versions) or press F3 (console versions).
- Enter the new size and proceed with the compaction. Note: In Simple Operations mode, if multiple partitions exist on the selected drive multiple partitions may be compacted.
- If using Image for Windows in a live Windows system and VSS will be used when creating the new backup image or when copying to the smaller drive, be aware that the VSS cache may increase the required restore size. To help avoid this issue it's recommended to restart Windows prior to the VSS operation or perform the backup or copy operation outside of Windows (e.g. TBWinRE, Image for Linux, or Image for DOS).
To resize a partition:
- Boot into BootIt Bare Metal, BootIt UEFI, or Image for Linux GUI (to use Partition Work).
- Enter Partition Work.
- Select the partition than needs resized.
- Click the Resize button.
- Click OK to check the file system for errors.
- Enter the new size and then click OK.
The time required to compact or resize a partition depends on the amount of data that must be moved and the speed of the system.
Restore Methods
This article outlines the following three methods of restoring to a smaller drive or partition:
- Method 1 — Normal Restore
- Method 2 — Restore using "Compact Data"
- Method 3 — Compact/Resize, Image, and Restore
- Method 4 — Use the TBOSDT copywin.tbs script
- Method 5 — Use robocopy
Some methods are better suited for certain scenarios than others. It's recommended to read through all of them before selecting one if you are unsure which method is best for your particular situation.
Unless otherwise stated, the instructions below are using the following base system configuration as an example:
- The source drive is 500GB with a single 465GB partition containing Windows and 150GB of programs and data.
- The source drive's required space for restore is 220GB.
- A backup image of the source drive has been created (SOURCE.TBI).
- The destination drive is either a 128GB, 180GB, or 256GB SSD drive.
Method 1 — Normal Restore
For the purpose of this article, a "normal restore" is one which requires no compacting, resizing, or special steps to accomplish prior to restoring. This type of restore can be used any time the required space for the restore is less than the available space on the destination drive — even if the source partition is actually much larger. In the case of a single partition, a normal restore (or copy) will automatically attempt to resize to the smaller space.
Using the example configuration, SOURCE.TBI can be restored normally to the 256GB SSD since it requires only 220GB. It would not be possible to do a normal restore to the 128GB SSD due to insufficient available space.
When restoring an OS partition or disk image (entire drive), any standard options necessary to ensure proper booting would also apply here (Set Active, Update BOOT.INI, Update Boot Partition, Restore First Track, etc.). Additionally, when restoring a disk image and the source drive was larger than the destination, the Scale to Target or Scale to Fit option must be selected. Otherwise, the program will report that there's not enough space on the destination drive even if there is.
Method 2 — Restore using "Compact Data"
This type of restore is just like the normal restore in Method 1 except the Compact Data option is used.
Using the example configuration, SOURCE.TBI can be restored to the 180GB SSD since it requires only 150GB for the data. It would not be possible to do a restore to the 180GB SSD without using Compact Data since that would require 220GB of space.
When restoring an OS partition or disk image (entire drive), any standard options necessary to ensure proper booting would also apply here (Set Active, Update BOOT.INI, Update Boot Partition, Restore First Track, etc.). Additionally, when restoring a disk image and the source drive was larger than the destination, the Scale to Target or Scale to Fit option must be selected. Otherwise, the program will report that there's not enough space on the destination drive even if there is.
Method 3 — Compact/Resize, Image, and Restore
Using the example configuration, restoring an image of the 465GB partition to the 128GB SSD could be performed as follows:
Using Compact:
- Move 100GB of data files to a USB drive to bring the total used space down to around 70GB.
- Boot to Image for Linux.
- Select the Backup option (you'll most likely want to create a Full backup).
- Proceed though the steps until you get to the screen where you select which partitions to include.
- Select the 465GB Windows partition.
- Make sure the 465GB Windows partition is highlighted and use the Compact option (press F3).
- Specify a size of 100GB.
- After the compaction completes, continue with creating the backup image of the partition.
Note: This example uses Image for Linux to create the new backup image so Windows isn't running. However, if using Image for Windows in a live Windows system and VSS will be used when creating the new backup image or when copying to the smaller drive, be aware that the VSS cache may increase the required restore size. To help avoid this issue it's recommended to restart Windows prior to the VSS operation or perform the backup or copy operation outside of Windows (e.g. TBWinRE, Image for Linux, or Image for DOS).
- Restore this image to the 128GB SSD, specifying to resize it to use all available free space. When restoring an OS partition, any standard options necessary to ensure proper booting would also apply here (Set Active, Update BOOT.INI, Update Boot Partition, etc.) — just as with a normal restore.
Using Resize:
- Move 100GB of data files to a USB drive to bring the total used space down to around 70GB.
- Boot to a partitioning program (such as BootIt Bare Metal or Partition Work in Image for Linux GUI) and resize the 465GB partition to 100GB.
- Boot to Image for Linux and create a backup image of the 100GB Windows partition.
- Restore this image to the 128GB SSD, specifying to resize it to use all available free space. When restoring an OS partition, any standard options necessary to ensure proper booting would also apply here (Set Active, Update BOOT.INI, Update Boot Partition, etc.) — just as with a normal restore.
Either method will accomplish the same results. You may end up compacting some partitions and resizing others depending on the particular need at the time.
Once a partition has been compacted or resized an alternative method would be to copy it directly instead of imaging and restoring.
Method 4 — Use the TBOSDT copywin.tbs script
The TeraByte OS Deployment Tool Suite Pro (TBOSDT) copywin.tbs script can be used to create a file copy of a Windows partition. TBOSDT Pro is included with the purchase of the TeraByte Drive Image Backup and Restore Suite. TBOSDT Pro for BootIt is included with BootIt Bare Metal and BootIt UEFI. (Starting with version 1.63, TBOSDT Pro for BootIt is unlocked by entering your BootIt key in TBOSDT Pro. For older versions, those who have purchased BootIt BM will have a separate download in their TeraByte account for TBOSDT Pro for BootIt.)
This method performs a copy similar to Method 5 (robocopy), but automates the process. Before using this method, be aware of the following:
- Copying files can take much longer than restoring an image or copying a partition.
- The copywin script must be run from a Windows-based environment (e.g. Windows 7, TBWinRE).
- You can copy from either an existing drive letter or from an image backup (.tbi file). Note that copying from an image backup requires TBIMount to be installed at the default location.
- It is not recommended or supported to copy the booted Windows partition. Instead, boot into WinRE/PE (e.g., TBWinRE, TBWinPE) or another Windows installation (if multi-booting) to copy the Windows partition. Alternatively, create a backup image of the partition and use the image as the source for the copy.
- The copywin script will use robocopy if it's available. Some versions of robocopy do not copy file security settings correctly in certain situations. For details refer to this Microsoft KB article: http://support.microsoft.com/kb/979808
- TBOSDT Pro for BootIt is required if partitioning changes will be needed. For example, if copying to unallocated space and a partition will have to be created.
Using copywin:
- If the Windows installation you're copying requires additional partitions you should copy or restore them to the new drive prior to running the copywin script. For example, if copying a Windows partition on an MBR type disk that boots from the System Reserved partition, copy or restore the System Reserved partition to the new drive. For GPT disks you would normally need to copy or restore the Recovery, EFI System, and Microsoft Reserved partition. Doing this before running the script will allow it to fix-up booting for the copied Windows partition.
Important: When copying or restoring the partition(s) it's necessary to change the Disk Signature or GUIDs to prevent Windows from setting the disk offline. If the disk is offline the destination partition will not be accessible to the script. For a single partition use the Change GUID option; for disk/multi-partition use the Change Disk ID and GUIDs option.
- Create the destination partition on the new drive. Format it NTFS and assign it a drive letter. If you skip this step and have the script copy to unallocated space you will need to use TBOSDT Pro for BootIt so the new partition can be created.
- Run TBOSDT and the copywin script: If you are in TBWinRE/PE and included TBOSDT in the build you can run the script directly from the Scripts menu of TBLauncher (select the TeraByte - Copy Windows Script item). If you're in a Windows installation with TBOSDT Pro installed you can double-click the copywin.tbs file. Otherwise, run tbosdtw.exe (or tbosdtw64.exe), change to the scripts folder if necessary, and then run copywin.tbs:
runtbs copywin
- Select to either copy from an existing drive letter or from a TBI backup image and proceed through the prompts. You will be warned if a boot partition isn't found on the new drive.
- After the script has finished you can perform any boot repairs needed. For example, if there was no boot partition you will need to make the Windows partition bootable. Also note that WinRE entries in the BCD will still reference WinRE on the original drive (repairs will be required to make it functional on the new drive).
- Before booting the new drive it's highly recommended that the original source drive be disconnected or disabled to avoid issues with Windows detecting the new drive and Windows partition.
Method 5 — Use robocopy
This method actually copies all the files and folders from one partition (or mounted partition image) to another and is most practical when the operation involves simple data partitions.
Before using this method, consider the following points:
- Copying files can take much longer than restoring an image or copying a partition.
- It is not recommended or supported to copy the booted Windows partition using robocopy. Boot into WinPE (e.g., TBWinRE, TBWinPE) to copy the Windows partition.
- Some versions of robocopy do not copy file security settings correctly in certain situations. For details refer to this Microsoft KB article: http://support.microsoft.com/kb/979808
- NTFS JUNCTION points do not get copied. They must be excluded (use the /xj option) to avoid errors and recursive issues. Any junction points must be recreated after the copy has completed. For this reason, it is not recommended to use robocopy to copy a Windows partition that makes heavy use of junction points (e.g., Vista, Windows 7/8.x/10). More information on this can be found in Appendix A below.
Keep in mind that when running robocopy in a version of Windows with UAC enabled it should be from an Administrator Command Prompt. The Windows 7 version of robocopy is used in the examples here. If you have a version of Windows that doesn't include robocopy, such as XP, you can create a TBWinPE build and use the version included with it.
Steps involved in copying a simple data partition from an image file:
- Create and format the destination partition.
- Use TBIMount (included with Image for Windows) to mount the data partition image.
- Open a Command Prompt (use Administrator Mode in versions of Windows with UAC enabled, such as Vista and Windows 7).
- Run robocopy with the appropriate commands (see example below).
Steps required in copying an NTFS Windows partition from an image file:
- Create and format the destination partition. If necessary, correct the boot sector for the version of Windows being placed on it.
- Use TBIMount (included with Image for Windows) to mount the Windows partition image.
- Open a Command Prompt (use Administrator Mode in versions of Windows with UAC enabled, such as Vista and Windows 7).
- Obtain a list of JUNCTION points.*
- Run robocopy with the appropriate commands (see example below).
- Recreate the JUNCTION points on the destination partition.*
- Set the attributes for the JUNCTION points.*
- Perform any necessary boot repairs to get the new drive and partition fully functional.
*See Appendix A
Here is an example robocopy command (should be all on one line):
robocopy z:\ c:\ *.* /e /efsraw /copyall /dcopy:t /r:0 /log:c:\rclog.txt /v /xj
A brief description of the options used here as well as several others that may be helpful are shown in the following table:
| z:\ | Source path (e.g., drive letter assigned to mounted partition) |
| c:\ | Destination path (drive letter assigned to destination partition) |
| *.* | What to copy (in this case, everything) |
| /e | Copy subdirectories, including empty ones |
| /efsraw | Copy all encrypted files in EFS RAW mode |
| /copyall | Copy all file info (equivalent to /copy:datsou) |
| /dcopy:t | Copy directory timestamps |
| /r:0 | Number of retries on failed copies (set to zero here since retries are not desired) |
| /w:0 | Number of seconds to wait between retries (not needed if no retries are specified) |
| /log:c:\rclog.txt | Save log file at specified location (this can be helpful to verify the operation and check for errors) |
| /v | Verbose log (shows skipped files) |
| /tee | Output progress to console window as well as the log file |
| /xj | Exclude JUNCTION points (necessary for Windows OS partitions to avoid problems) |
| /l | (optional) List only - don't copy (simulates the operation) |
| /b | (optional) Copy files in Backup mode (allows files to be opened without security restrictions) |
Additional help for robocopy options can be found by running the following command (you'll need to scroll the Command Prompt window to view it):
robocopy /?
Utilizing the following tips can help the process run more smoothly:
- Create a log file and use the verbose option ( /log:c:\rclog.txt and /v). The log can be very helpful in analyzing the operation and correcting any errors or issues.
- When running in WinPE using the /tee option can cause the operation to progress much more slowly than you might expect. This is because there is no video acceleration in WinPE and scrolling the console window takes considerable time. Resizing the window smaller vertically (e.g., leaving just a line or two visible) can speed up the operation tremendously.
- The default retry attempt count is one million with a default wait time of 30 seconds between tries. Make sure to specify 0 (zero) retries (or a much lower count, if you want robocopy to try again on errors). In most cases, it may be better to check the log for errors since retrying will probably fail.
- It is recommended to exclude copying JUNCTION points even on non-OS partitions. They can cause recursive issues and errors, which will be retried if that option is used.
- When copying Windows partitions it will usually be necessary to manually perform "boot repairs" before the copied system will boot properly. This can include updating the boot.ini file or BCD, updating the MBR and/or boot sector code, setting the correct partition active, correcting drive letter assignments, and so on.
Appendix A — robocopy and Junction Points
Typically, Windows Vista and Windows 7/8.x/10 have over 40 Directory Junctions and only one Directory Symbolic Link. All of these need to be recreated after the copy has completed in order for the system to function correctly.
The easiest method to obtain a list of all the junction points on the source partition (mounted or physical) is by running dir /al /s from the Command Prompt and redirecting it to a file:
dir z:\*.* /al /s > e:\juncpnts.txt
(where Z: is the source partition and E: is where you want the file saved)
The first few lines of output for a Windows 7 partition image mounted as Z: are shown below (note that some lines may wrap depending on page width):
Volume in drive Z has no label.
Volume Serial Number is 00EE-C91D
Directory of Z:\
07/13/2009 08:53 PM <JUNCTION> Documents and Settings [C:\Users]
0 File(s) 0 bytes
Directory of Z:\ProgramData
07/13/2009 08:53 PM <JUNCTION> Application Data [C:\ProgramData]
07/13/2009 08:53 PM <JUNCTION> Desktop [C:\Users\Public\Desktop]
07/13/2009 08:53 PM <JUNCTION> Documents [C:\Users\Public\Documents]
07/13/2009 08:53 PM <JUNCTION> Favorites [C:\Users\Public\Favorites]
07/13/2009 08:53 PM <JUNCTION> Start Menu [C:\ProgramData\Microsoft\Windows\Start Menu]
07/13/2009 08:53 PM <JUNCTION> Templates [C:\ProgramData\Microsoft\Windows\Templates]
0 File(s) 0 bytes
Directory of Z:\Users
07/13/2009 08:53 PM <SYMLINKD> All Users [C:\ProgramData]
07/13/2009 08:53 PM <JUNCTION> Default User [C:\Users\Default]
0 File(s) 0 bytes
The information in this file can be used to recreate the junction points. Be aware that the drive letter used in the junction path is the letter that is correct for its original configuration and most likely not the drive letter assigned that partition in the currently running Windows system. In the above sample output, you can see that C:\ is used for the junction paths — not the currently assigned Z:. When recreating the junction points make sure to use the drive letter that will be correct when the partition is booted. In most cases, this means that you would use the same drive letter that was originally used. Note: The drive letter used must be valid when the junction point is created. However, the path specified does not need to exist.
Attributes of the recreated junctions also need to be set. The attributes used can be found by examining the source partition. Windows Vista and Windows 7 use the Hidden, System, and non-Indexed attributes for junctions. Windows XP, which usually only has a couple of junctions, may not have any attributes set for them.
The attributes used for a junction point can be found and set by using attrib at the Command Prompt. For example, to find the attributes of the Documents and Settings junction on the mounted Z: drive:
attrib "Z:\Documents and Settings" /L
To set the attributes:
attrib +h +s +i "F:\Documents and Settings" /L
Here are two examples of recreating junction points. F: is the drive letter assigned to the copied Windows 7 partition and C: is the drive letter that partition will be assigned when booted. All commands are run from an Administrator Command Prompt. Note that since many junction points reside in the same folders it can be beneficial to change to that directory before running the commands.
Example 1 — Creating a Directory Junction (displays as <JUNCTION>):
- f:
- cd \ProgramData
- mklink /j "Desktop" "C:\Users\Public\Desktop"
- attrib +h +s +i "Desktop" /l
Example 2 — Creating a Directory Symbolic Link (displays as <SYMLINKD>):
- f:
- cd \Users
- mklink /d "All Users" "C:\ProgramData"
- attrib +h +s +i "All Users" /l
Depending on the number of junction points that need to be created, advanced users may wish to automate the procedure. For example, a script or small program could be written to parse the text file and create a batch file to create the junction points.
Appendix B — Using a TBIHD Loaded Drive
In cases where you would be restoring from an image and find you need to make changes to it so the restore can succeed (e.g. file system needs checked, data needs to be removed, etc.), you may be able to use the TBIHD utility to load the image so you can make the changes instead of needing to restore it to an alternate location and then create a new image after the changes are made. While it's possible to create a new image of the modified TBIHD mounted drive to use for the restore operation, it may be quicker and easier to use it directly as the copy source drive.
Important: Windows will not allow two identical drives to be online at the same time. The newly attached drive will either be set offline or Windows will change the signature/GUIDs to different values to avoid a collision. For Windows drives in particular, having the values changed may be undesirable. When loading the image with TBIHD you have the option to change the values (Change Disk Sig/GUIDs) -- don't use this option if you want your new backup image of the changed drive or the copy destination (if copying) to have the same ID values as the original. One solution is to make sure the original source drive is not connected when you load the image. This will allow the image to come online and retain its original ID values. Another solution is to take the source drive offline before loading the image.
In the example below, an image will be loaded so chkdsk can be run on one of the partitions. Since this is a Windows drive the signature/GUIDs will not be changed when loaded. Note that this operation can be performed from Windows provided having the source drive disconnected isn't a problem (e.g. the source drive has failed and been removed or when doing the restore on a different system). The operation can also be performed from TBWinRE/PE if the build contains TBIHD.
Example: An existing entire drive backup image of a 1TB drive containing a Windows installation needs to be restored to a 500GB SSD. The 1TB drive has already been removed from the system and the 500GB SSD has been connected. Booted to TBWinRE, a normal restore using Scale to Fit was attempted since the amount of used data would fit on the smaller drive. However, file system errors prevent the Windows partition from resizing smaller and the restore failed.
- Start TBIHD.
- Select the backup image of the 1TB drive. Make sure the Enable Simulated Writes option is selected and the Change Disk Sig/GUIDs option is not selected. If necessary, select a partition to use as the cache drive. If any partitions exist on the destination drive (the 500GB SSD, in this case), make sure not to select one of those. TBIHD will auto-select a partition if no selection is made.
- Load the image. The drive from the backup image will mount as a drive. In most cases, drive letters will be assigned to normal partitions (such as the Windows partition). If necessary, use Disk Management or DISKPART to assign letters.
- Run chkdsk on the Windows partition to fix the errors.
- Run Image for Windows and copy the entire mounted drive to the 500GB SSD using the Scale to Fit option.
- When finished, unload the image using TBIHD.
Note: For scenarios where you need to remove data from the drive to reduce the used space enough to fit the smaller drive, you would do that in Step 4.